Animating SVG filters with React
Here's how to combine and animate Scalable Vector Graphic (SVG) filters to produce a disintegration effect using React and requestAnimationFrame.
Want to see what it looks like? Click Disintegrate for a quick demo.
Turbulence frequency: 0.100
This animation works by combining three techniques:
- Chaining multiple SVG filters together in a single SVG.
- Using the browser's requestAnimationFrame method to request callback at 60hz.
- Rendering the SVG repeatedly using React, reconfiguring the filters to produce the animation.
This technique lets us apply this disintegration effect onto any arbitrary SVG image.
How do SVG filters work?
SVG filter elements are built into the SVG specification—they're what make this magic possible.
There are lots of cool filter elements available, but this effect uses these three, each of which are explained in more detail below:
We can add these filter elements into our SVG's XML representation by wrapping our SVG content in a group with
a filter element applied to it, like this:
<svg>
    <filter id="disintegrate">
        <feTurbulence
            baseFrequency="0.01"       <!-- Vary this baseFrequency value -->
            numOctaves="5"
            result="noise"/>
        <feDisplacementMap
            in="SourceGraphic"
            in2="noise"
            scale="50"                 <!-- Vary this scale value -->
            xChannelSelector="R"/>
        <feComponentTransfer>
            <feFuncA
                type="table"
                tableValues="0 0 0 0"  <!-- Vary the fourth value in these tableValues -->
                />
        </feComponentTransfer>
    </filter>

    <g filter="url(#disintegrate)">
        <!-- actual SVG content here -->
    </g>

</svg>
The optional "in", "in2", and "result" parameters on these filter elements configure them to process the original, unfiltered SVG image in this order:

But, before we add them together—what does each of these filter elements do on its own?
Making some noise with feTurbulence
feTurbulence generates noise—specifically, Perlin noise. For our purposes, this is useful because of the pseudo-random pattern it generates across the image grid.
On its own, this filter's outputted "noise" image (at various frequencies) looks like this:
Turbulence frequency: 0.100
Of course, this somewhat random turbulence isn't very useful for us on its own—but it comes in handy for giving us values to use for displacing each pixel in the source image by varying amounts.
Displacing pixels with feDisplacementMap
It might be possible to write some Javascript to calculate these per-pixel displacements on their own. But we don't need to do all that work—that's exactly what the feDisplacementMap filter element does!
Unlike feTurbulence, feDisplacementMap takes two input "images"—one as source material, and one to use to calculate the X and Y
offsets by which to displace each pixel in the output image.
Here's what feDisplacementMap looks like with different frequencies of Perlin noise and a variable scaling factor:
Turbulence frequency: 0.100
Displacement scale: 100
These two filters get us pretty close to our "disintegration" effect, but we can't scatter the pixels forever. In order to cleanly finish off our animation, we will need to make our pixels completely disappear.
Fading away with feComponentTransfer
Making the pixels "disappear" is simple enough—just steadily increase their transparency until we can no longer see them. To accomplish this, we use our third filter element, feComponentTransfer.
Image opacity: 70%
feComponentTransfer remaps the RGBA values of each pixel in its input image, transforming them in the output image.
For our purposes, we just want to tweak the A (alpha) channel of each pixel, steadily decreasing the opacity from 1 to 0.
Wrapping the SVG in a React component
Of course, on their own, these filter elements are not animated. For that, we use a bit of Javascript.
In order to disintegrate our SVG, we need to
re-render it repeatedly, steadily increasing feDisplacementMap's displacement scale to scatter the pixels ever more widely,
then increasing its transparency towards the end of the animation to fade the pixels away completely.
To accomplish this, we'll simply wrap our basic SVG in a React component, so as we vary these variable values in our React state, React will re-render our image, animating its disintegration.
Here's our SVG again, wrapped in a React component this time, with our filter configurations parameterized:
export interface DisintegratableSVGProps {
    turbulenceFrequency: number;
    displacementScale: number;
    transparency: number;
    svgUrl: string;
}

export const DisintegratableSVG = (props: DisintegratableSVGProps) => {
    return <div>
        <svg viewBox="0 0 800 400" width="100%" height="100%" preserveAspectRatio="none">
            <filter id="disintegrate">
                <feTurbulence
                    baseFrequency={props.turbulenceFrequency}
                    numOctaves="5"
                    result="noise"/>
                <feDisplacementMap
                    in="SourceGraphic"
                    in2="noise"
                    scale={props.displacementScale}
                    xChannelSelector="R"/>
                <feOffset
                    dx={-props.displacementScale / 10}
                    dy={-props.displacementScale / 10}/>
                <feComponentTransfer>
                    <feFuncA
                        type="table"
                        tableValues={"0 0 0 " + props.transparency}/>
                </feComponentTransfer>
            </filter>

            <g filter="url(#disintegrate)">
                <image width="100%" height="100%" href={props.svgUrl}/>
            </g>
        </svg>
    </div>
}
There! Now we have an SVG, wrapped in a React component, that we can easily re-render, varying our filter configuration values while doing so.
Animating with window.requestAnimationFrame
To finish off our disintegration effect, we need to actually execute those renders at 60 frames per second. For this, we'll rely on the browser's requestAnimationFrame method.
Our approach here is simple. When we trigger the animation, it will begin by flipping a boolean flag in our React component's
state, setting animating to true and our frameIdx to 0. This state change will trigger our first animation render.
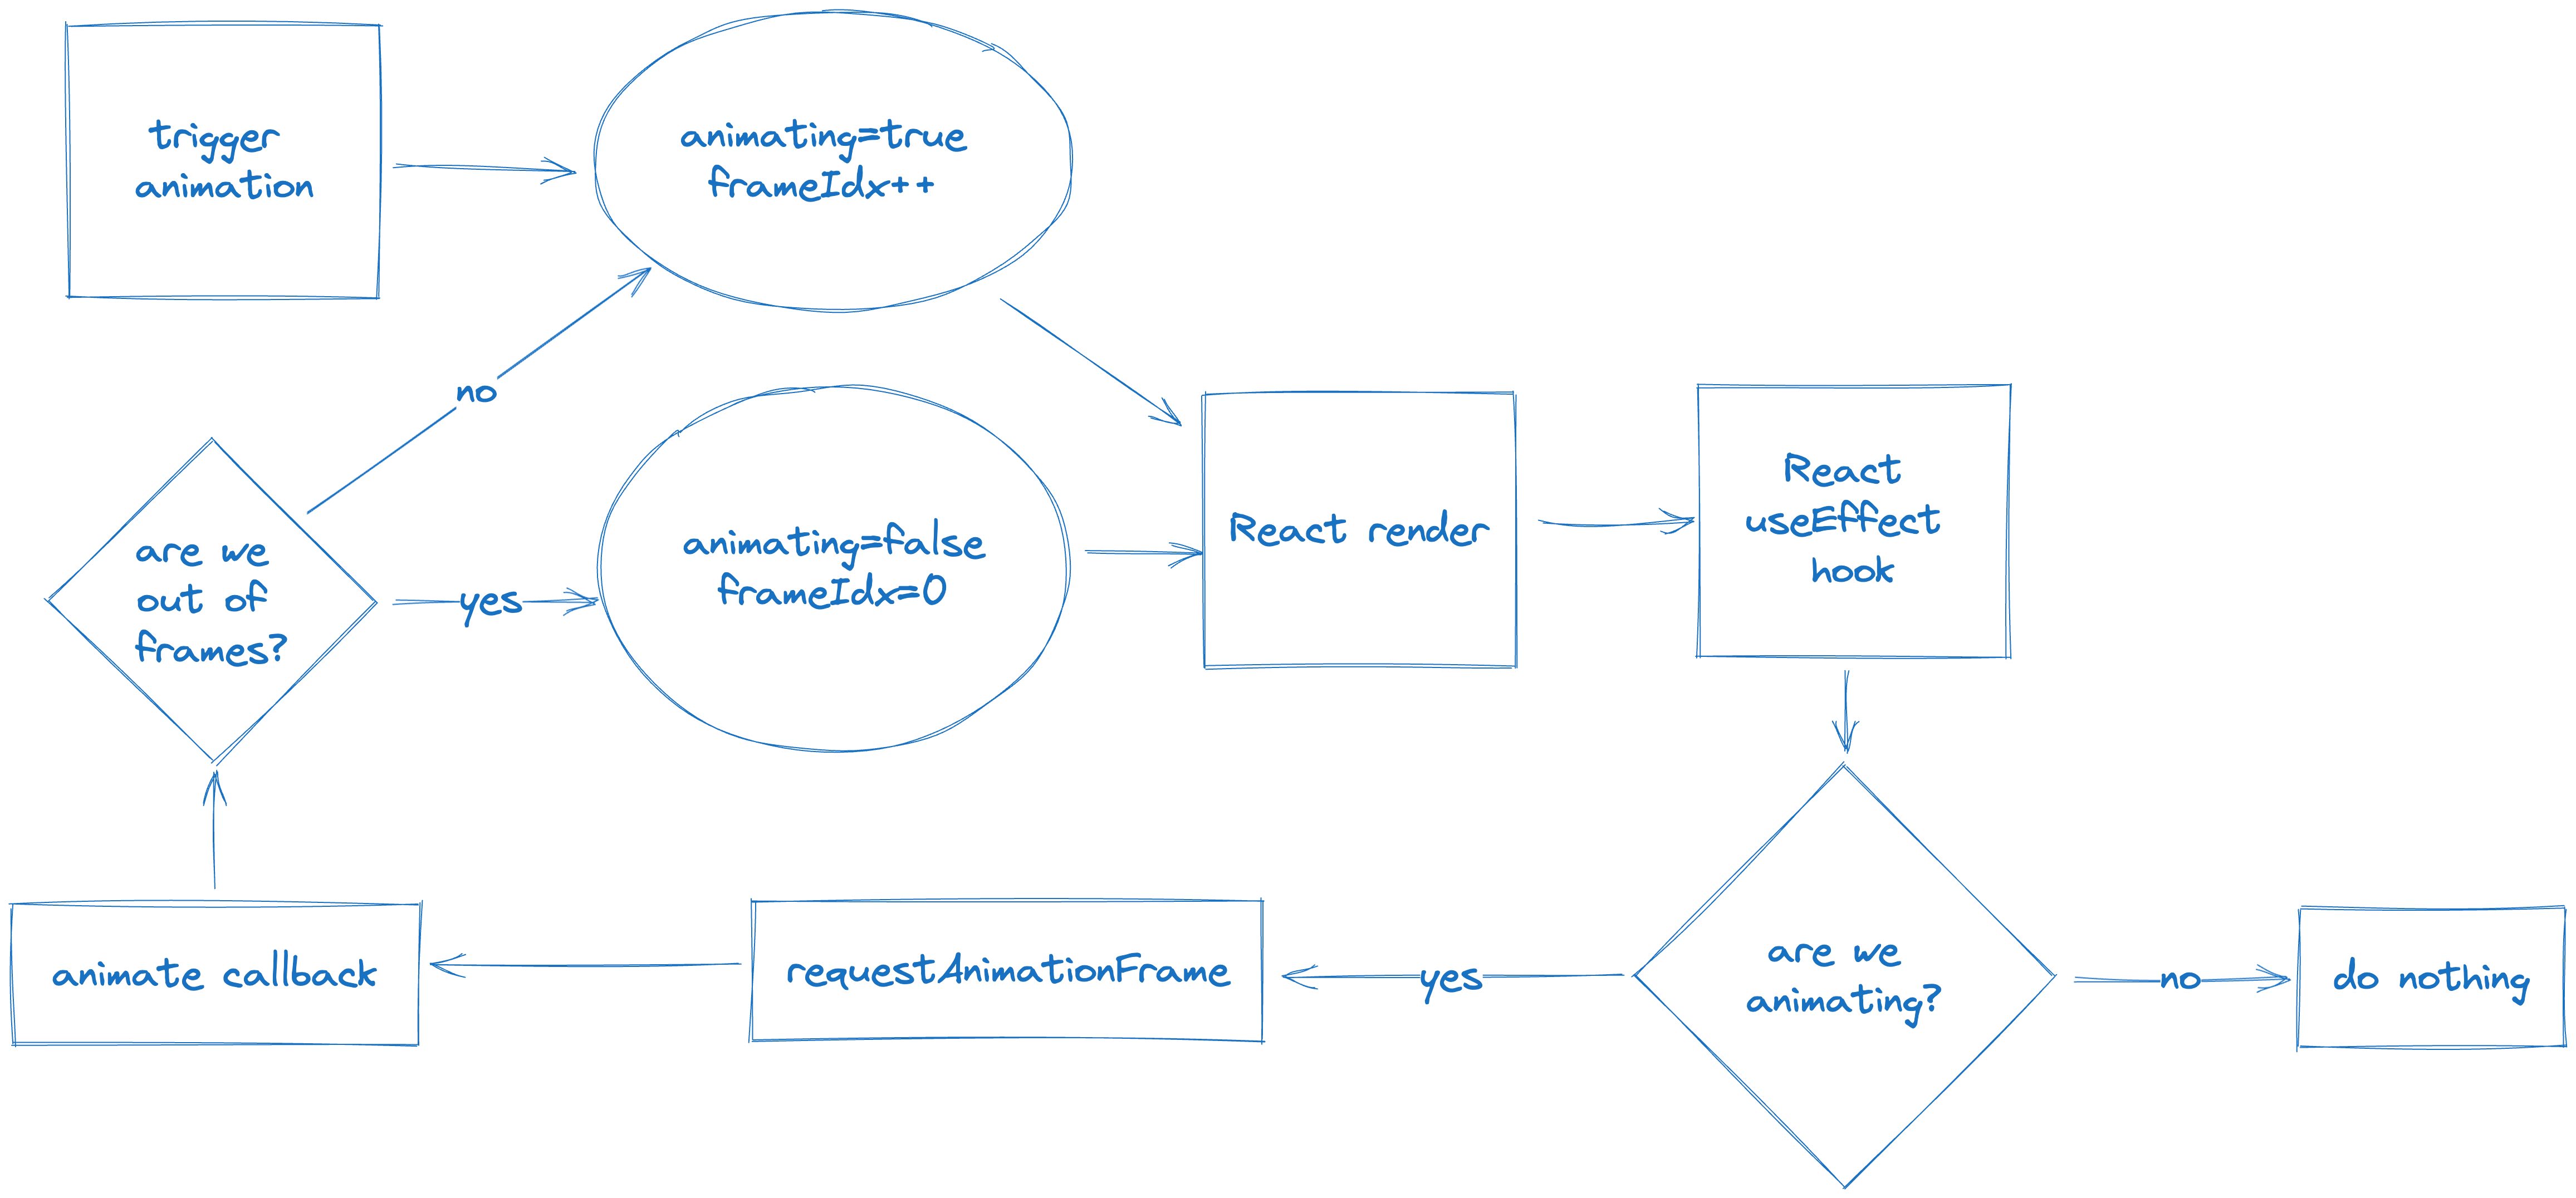
From there, upon render, we will use React's useEffect hook to call requestAnimationFrame. When the browser calls
our animate callback, we will use that callback to update our React state, advancing our frameIdx and thus,
continuing the animation upon re-render.
When we get to the end of our animation's frames, our animate callback will flip the animating flag in our state back
to false, triggering a final render which resets us back to the React component's starting state.
Here's what the Typescript demo class looks like:
export interface DisintegrationDemoProps {
    svgHref: string;
}

export const DisintegrationDemo = (props: DisintegrationDemoProps) => {

    // animation will take 1 second, 60 fps
    const scaleFrames: number[] = [];
    for (let i = 0; i < 60; i++) {
        scaleFrames.push(i*8);
    }
    const transparencyFrames: number[] = [
        1, 1, 1, 1, 1, 1, 1, 1, 1, 1, 1, 1, 1, 1, 1, 1, 1, 1, 1, 1,  // first 20 frames, stay opaque
        1, 1, 1, 1, 1, 1, 1, 1, 1, 1, 1, 1, 1, 1, 1, 1, 1, 1, 1, 1,  // next 20 frames, still opaque
        0.9, 0.9, 0.8, 0.8, 0.7, 0.7, 0.6, 0.6, 0.5, 0.5,            // next 10 frames, fade to 50%
        0.4, 0.4, 0.3, 0.3, 0.2, 0.2, 0.1, 0.1, 0,   0               // last 10 frames, fade from 50% to 0%
    ];

    const [state, setState] = useState({animating: false, frequency: 0.1, frameIdx: 0});

    const animate = (_) => {
        if (state.frameIdx > 90) {
            // end the animation
            setState({
                animating: false,
                frequency: state.frequency,
                frameIdx: 0,
            });
        } else {
            // change the state, using the hardcoded frame values
            setState({
                animating: true,
                frequency: state.frequency,
                frameIdx: state.frameIdx + 1,
            });
        }
    }

    useEffect(() => {
        // keep the animation going if we're rendering one already
        if (state.animating) {
            window.requestAnimationFrame(animate);
        }
    });

    // When we get past the 60th frame, hardcode the values.
    // This effectively pauses the animation for a few frames before resetting.
    const displacementScale = state.animating ? scaleFrames[Math.min(59, state.frameIdx)] : 10;
    const transparency = state.animating ? transparencyFrames[Math.min(59, state.frameIdx)] : 1;

    return <div>
        <DisintegratableSVG
            turbulenceFrequency={state.frequency}
            displacementScale={displacementScale}
            transparency={transparency}
            svgUrl={props.svgHref}
        />
        <button onClick={() => {setState({frameIdx: 0, animating: true, frequency: state.frequency})}}>Disintegrate!</button>
    </div>
}
That's all it takes! Happy animating. 🚀